


Open the installer package and follow the instructions. You may install GtkRadiant anywhere you choose.
Run GtkRadiant from the shortcut provided and choose a game to edit from the game-selection dialog.
Setting up Paths
Set the path to the engine in Edit > Preferences > Settings > Paths.Improving Performance
If you find that the editor is sluggish on your system, try some or all of the following tweaks:- Upgrade to the latest drivers for your opengl graphics hardware.
- Enable far-clip-plane in Edit > Preferences > Settings > Camera. This reduces the number of game components in view, by shortening the distance that the editor can "see." Use Ctrl+']' to set the distance to 13 (a good number in this case).
- If you have a very old system, reduce the Texture Render Mode in Edit > Preferences > Display > Textures. Select an option earlier on the list than your current setting. We recommend not going below Nearest MipMap first. This reduces the amount of blending and filtering in the textures as they are seen in the Camera window, but still lets you see what the textures look like in a relatively undistorted manner. The Nearest setting will further improve performance, but textures may be distorted when seen in perspective.
- In Edit > Preferences > Settings > Orthographic, disable “Update views on camera move.” This will stop the 2D-map window(s) from being redrawn when the camera position changes.
- Reduce the Texture Quality in Edit > Preferences > Display > Textures.
- Increase the Patch Subdivide Threshold in Edit > Preferences > Display > Patches.
- Further performance can be gained by filtering curves with View > Filter > Patches.
Setting up Preferences
To set up your editing preferences, open the Edit menu and select Preferences. Use preferences to set a variety of options and editor behavior based on your personal preferences.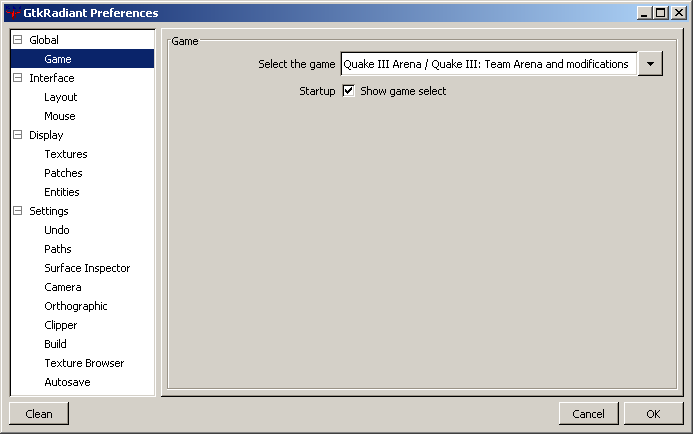
Globals
- Log The Console To radiant.log - This will cause GtkRadiant to create a log file of all output from the GtkRadiant console. This can cause the editor to slow down, and is normally used for debugging purposes.
-
Game Settings / Select The Game
Choose a game configuration to use from the list. GtkRadiant must be restarted before the configuration will take effect.
GtkRadiant now stores preferences on a per game basis. Any settings for a given game are stored for that game mode only.
Interface
- Start on Primary Monitor - Work-around for opengl problems with certain multi-monitor opengl implementations.
- Disable System Menu on popup windows - Work-around for window-manager problems on multi-monitor systems.
- Native File-Chooser - Use the standard windows file-chooser instead of the GTK+ file-chooser.
- Default Text-Editor - Use the program associated with *.txt file-type when editing text-files, instead of the built-in text-editor.
Layout- Layout - Choose from four layout styles.
 Split Window View - This is the QeRadiant default view. The Camera, XY Map, Z-axis Scale, Texture, and Console windows are constantly displayed. While the arrangement of the windows cannot be changed, their size is adjustable by pulling the window border splitters. The Entity and Group windows share a common pop-up window. This arrangement is one that may work particularly well for mappers using smaller monitors and slower computers.
 Floating Window View - This is the view used by id designers. The position, arrangement, and size of the windows are all adjustable. The windows initially come up on top of one another (a known bug), but once positioned, this view offers the greatest flexibility. The Camera, XY Map, Z-axis Scale, and a shared Entity/Texture/Console/Group window are all displayed simultaneously. Changing the size of one window does not automatically affect the others (it can lay atop the others). Additional map layout views can be cycled from menu commands or bound keys. This view only works well if you have a 20+-inch monitor.
Make it Big! In floating windows mode (ONLY), you can double-click on any window’s Title Bar to enlarge the contents of the window to fill the screen. Double clicking on it again reduces it back to normal size. Quad View - The display window is split into four equal-sized windows: Camera, XY Map, YZ Map, and XZ Map. This is similar to other editors and offers four-way viewing. You see the map components in three views simultaneously. The size of the windows (relative to each other) can be adjusted, by pulling the splitters. The combined Entity/Texture/Console/Group window is brought into view as a single, floating window that lays over the others. The Z-axis window is not used in this view. This is a popular editing configuration, but it has significant performance issues. The editor is drawing all the 2D map components three times (plus maintaining a camera view). Some mappers have notice significant performance slow-downs when working with curves. Using the Quad view is only recommended for mappers with more powerful computers.
 Reverse Split Window View - Essentially the same as the Split Window view, except that the layout is flipped left to right.
- Detachable Menus - allow the menus to be detached and moved around.
- Patch Toolbar - Show additional patch-specific toolbar buttons.
- Patch Toolbar - Show plugin-specific toolbar.
Mouse
- Mouse Type: 2 Button / 3 Button - Use 2 button mode or 3 button mode. Each mode is different in some ways. The hot keys and key combinations are generally different for each mode.
- Right Button Activates Context Menu - If checked, this will create a menu where ever you click in the 2D View with a list of the entities you can select and place.
- Layout - Choose from four layout styles.
Display
- Texture Quality - This will increase or decrease the texture quality displayed in the texture window and 3D View.
- Texture Gamma - Lower gamma values will brighten the textures. It is recommended to use the OS display settings to adjust gamma for your graphics card instead.
- Texture Render Mode - Changes the filtering quality when rendering textured polygons in the OpenGL views.
- Hardware Texture Compression - Choose the texture-compression system to use, reduces texture memory usage.
- Patch Subdivide Threshold - Set the minimum curvature value at which to stop subdividing a patch for rendering. If set to low it can slow down the editor. If set very high it will look blocky. Essentially it works like the Quake3 r_subdivisions option.
- Show Light Radii - Enables rendering of light-radii around light entities.
Textures
Patches
Entities
Settings
- Undo Queue Size - Set how many undos you can do. This does require memory so do not set it too high if you do not have alot of memory.
- Engine Path - Set the path to the engine for the game being edited.
- Surface Inspector Increments Match Grid - Automatically fill in the Surface Inspector's shift 'step' values from the current grid setting.
- Movement Speed - This will increase or decrease the movement of forward, back, and strafing speed in the 3d view.
- Rotation Speed - This will increase or decrease the turning speed in the 3D View.
- Invert Mouse Vertical Axis - This will reverse the mouse controls in freelook mode.
- Discrete Movement - If checked, this causes the view in the 3d view to move one step at a time. If unchecked the movement is smoother.
- Enable Far-Clip Plane - sets the far-clip plane to be close to the camera. Improves rendering speed by reducing the amount of objects to be drawn.
- Render Mode - Choose the camera rendering mode from Textured, Flatshade or Wireframe.
- Solid Selection Boxes - This will make anything selected draw with solid lines rather then the old style of dashed boxes. This can speed up rendering on Nvidia TNT cards.
- Display Size Info - If this is checked on, it will display the size information of any object selected.
- Chase Mouse During Drags - Turning this on causes the view to chase the mouse if you drag something off the edge.
- Update Views On Camera Move - When interacting with the camera (which you will do a lot), turning this off will NOT update the camera icon location in the Map windows automatically. This can help with speed but prevents you from seeing exactly where the camera icon is positioned.
- Clipper Tool Uses Caulk - When using the clipper tool, the faces that are created from the clip will add a caulk texture to the brush.
Undo
Paths
Surface Inspector
Camera
Orthographic
Clipper
0 comments:
Post a Comment