It used to be that the photos with red eye weren't really worth fixing as only cheesy cameras had the flash built in and underneath the red eyes was a crappy photo. Well, welcome to the future when you can get a pretty good image from a camera with the flash built in.
They do not have a button that works to prevent this yet, so don't even try it. The best way to fix red eye on photos is to have those intense people look at the photographers shoulder.
The cause of red eye is the flash reflecting from the back of the eye and into the lens. So, until this lovely child is able to understand "look at my shoulder" it is good to know that red eye can be fixed, somewhat.
I learned the following method from tigert while lurking on the irc late late one night.
Before
After
In this tutorial I’ll show you how to do professional red-eye removal for flash pictures using The GIMP. This procedure seems lengthy at first, but after you’ve got the hang of it you’ll see that it can be done quite quickly. On top of that, it gives excellent results: eyes maintain the full catchlight and proper tonalities; something you don’t necessarily get with other “simpler” techniques.
The basic technique is to create a second layer in the image that has the proper tonalities in the pupils, although the layer as a whole will have the wrong color cast. We create a transparent layer mask and then add opacity to the just parts where the pupils are, which overlays the proper image below it.
Giving credit where credit is due: I did not come up with this method. I adapted it for The GIMP from a Photoshop tutorial on the luminous-landscape.com web site (great photography web site BTW; I recommend it).
The Procedure.
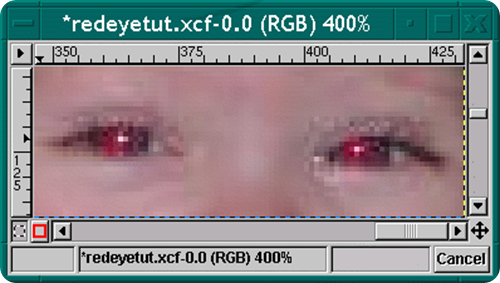
Here is the original example image, loaded into The GIMP.Cute kid, cute snapshot. Gotta get rid of those red eyes!
Once you’ve got your image loaded, start by right-clicking on the image and select Image/Mode/Decompose. In the dialog box that comes up, select “RGB” and click OK.Note: if you have the newer version of the compose/decompose plug-in, there is a checkbox to create the channels as layers in a single new image. If you have this option (shown at second right), use it–it will reduce the clutter on your screen!
Old plug-in:
New plug-in:
This will create three new windows, each containing one of the red, blue and green channels in the image. Look in the window titlebars to see which is which.Close the window that has the red channel.
[If you have the new decompose plug-in, and you checked the "As layers" box, it will create a single window with three layers, each containing a channel. You can delete the layer with the red channel if you want.]
Right-click in the window with the green channel and select Image/Mode/Compose. In the dialog box that comes up, select RGB; on the right, under “Channel Representations”, choose the following:
- For the red channel, choose the green channel image.
- For the green channel, choose the green channel image.
- For the blue channel, choose the blue channel image.
Click OK.
Another new window pops up: the original image minus the red channel component. Notice that it has a sickly-green color cast, but that the pupil is nicely black.At this point you can close the green and blue channel images.
Right-click in the composed image window that you just created and select Select/All. Right-click again and select Edit/Copy. (Alternatively you can use keyboard shortcuts Ctrl+A and Ctrl+C in succession to do both).Go to the original image, right-click and select Dialogs/Layers, Channels & Paths (or press Ctrl+L). This pops up the layers dialog box.
In the layers dialog box, right click on the background layer and select New Layer (or press Ctrl+N). In the New Layer Options dialog box, change the name of the new layer to “good pupils only” and click OK (default options are fine).
In the layers dialog, select the “good pupils only” layer, then right-click on the original image window and select Edit/Paste (Ctrl+V). The original image will now look like the green+blue composite, but only because the upper layer is hiding the background layer, which contains the original.
Go back to the layers dialog, and right click on the floating selection and select Anchor Layer (Ctrl+H).We won’t need the green+blue composite image any more, so you can close that window now if you want.
You can also close the individual green and blue channel windows.
In the layers dialog, right-click on the “good pupils only” layer and select Add Layer Mask. In the Add Mask Options dialog, select Black (Full Transparency) and click OK.
You should now see your original image again.At this point, the “good pupils only” layer is transparent because of the layer mask. We’re going to make the pupils part of the mask opaque.
Right click on the image and select Dialogs/Brushes. Select a small round brush that is fuzzy on the edges.
Go to the main GIMP toolbox window and make white the foreground color. Unless you have changed them, the GIMP normally starts with Black as the foreground and white as the background color. If this is case, just click the little exchange arrow to switch them.
While you’re in the main GIMP toolbox, select the zoom tool, then go back to the image and draw a rectangle around the eyes area. This will zoom you in for the touch-up work.
Go back to the main GIMP toolbox and select the brush tool (or press P in the image window). Carefully “paint” into the red pupil. As you paint, you will see the “good pupils” exposed. You are painting opacity into the layer mask.If you paint a little at a time, you can make use of the GIMP’s excellent undo feature if you accidentally stray too far outside of the pupil. Fear not, however. If you can’t undo, just switch the foreground color back to black and paint over your mistake to touch up the mask in the places where it needs to be transparent.
Check your results by zooming out (press the “-” (minus) key). Voila! No red eye, and you have preserved the catchlights and tonalities of the pupils.
At this point you can select the background layer and perform any additional image editing that you want (e.g. cloning the dried boogers off this kid’s nostrils!).Typically you’ll want to flatten the image if you want to save the result in a standard image file like TIFF. When you’re ready to save, right click on the image and select Layers/Flatten Image. You’re now free to save the image in whatever format you like. If you’re creating a master copy for further editing you can save it in the GIMP’s native XCF format without flattening it because it saves the layers.
If you liked this article, subscribe to the feed by clicking the image below to keep informed about new contents of the blog:


0 comments:
Post a Comment