


 I started working on a chapter for the Ubuntu Developers' Manual. The chapter will be on how to use media in your apps. That chapter will cover:
- Playing a system sound
- Showing an picture
- Playing a sound file
- Playing a video
- Playing from a web cam
- Composing media
- Using Quickly to get it all started
- Using Glade to get the UI laid out
- Using quickly.prompts.choose_directory() to prompt the user
- Using os.walk for iterating through a directory
- Using a dictionary
- Using DictionaryGrid to display a list
- Using MediaPlayerBox to play videos or Sounds
- Using GooCanvas to compose a singe image out of images and text
- Using some PyGtk trickery to push some UI around
Simple Player Tutorial.
Introduction.
In this tutorial you will build a simple media player. It will introduce how to start projects, edit UI, and write the code necessary to play videos and songs in Ubuntu.

 The app works by letting the user choose a directory. Simple Player then puts all the media into a list. The user can choose media to play from that list.
This tutorial uses Quickly, which is an easy and fun way to manage application creation, editing, packaging, and distribution using simple commands from the terminal. Don't worry if you are used to using an IDE for writing applications, Quickly is super easy to use.
Requirements
This tutorial is for Ubuntu Natty Narwhal (11.04). There are some key differences between 10.10 and 11.04 versions of Quickly and other tools that will make it hard to do the tutorial if you are not on Natty. So, probably best to make sure you are running 11.04.
You also need Quickly. To install Quickly:
$sudo apt-get install quickly python-quickly.widgets
This tutorial also uses a yet to be merged branch of Quickly Widgets. In a few weeks, you can just install quickly-widgets, but for now, you'll need to get the branch:
$bzr branch lp:~rick-rickspencer3/quidgets/natty-trunk
Note that these are alpha versions, so there may be bugs.
Caution About Copy and Pasting Code
In Python, white space is very significant, especially in terms of indentions. In HTML, white space is not. As a result, Blog postings frequently mangle Python code, no matter how carefully a blogger might format it. So while you're following along, be careful about copying and pasting out of here.
If you're going to copy and paste, you might want to use the code for the tutorial project in launchpad, from this:
Link to Code File in the Launchpad Project
You can also look at the tutorial in text format this:
Link to this tutorial in text for in Launchpad
Creating the Application.
You get started by creating a Quickly project using the ubuntu-application template. Run this command in the terminal:
$quickly create ubuntu-application simple-player
This will create and run your application for you.
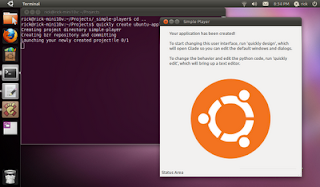
Notice that the application knows it is called Simple Player, and the menus and everything work.
To edit and run the application, you need to use the terminal from within the simple-player directory that was created. So, change into that directory for running commands:
$cd simple-player
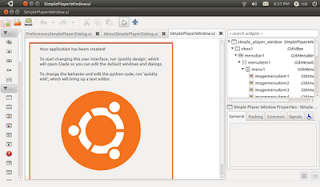
Edit the User Interface.
We'll start by the User Interface with the Glade UI editor. We'll be adding a lot of things to the UI from code, so we can't build it all in Glade. But we can do some key things. We can:
- Layout the HPaned that separates the list from the media playing area
- Set up the toolbar
To run Glade with a Quickly project, you have to use this command from within your project's directory:
$quickly design
If you just try to run Glade directly, it won't work with your project.
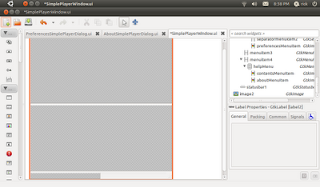
 Now that Glade is open, we'll start out by deleting some of the stuff that Quickly put in there automatically. Delete items by selecting them and hitting the delete key. So, delete:
- label1
- image1
- label2
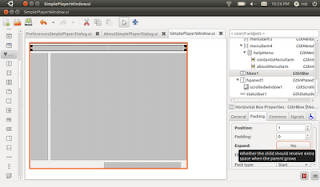
 Now, we want to make sure the window doesn't open too small when the app runs. Scroll to the top of the TreeView in the upper right of Glade, and select simple_player_window. Then in the editor below, click the common tab, and set the Width Request and Height Request.
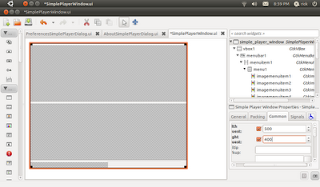 There's also a small bug in the quickly-application template, but it's easy to fix. Select statusbar1, then on the packing tab, set "Pack type" to "End".
Save your changes or they won't show up when you try running the app! Then see how your changes worked by using the command:
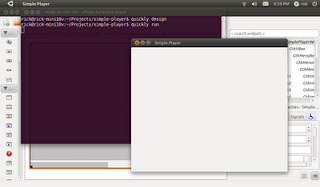
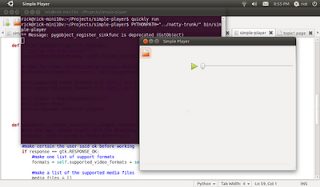
$quickly run
A nice blank window, ready for us to party on!
 Adding in Your Widgets
The main part of the user interface is going to have an area that divides between the list of media and the media when it is playing. There is widget for that called HPaned (Horizontal Paned). Find HPaned on the toolbox on the left, and click on it to active paint mode. Then click into the second open space in the main part of the window. This will put the HPaned in the window for you.
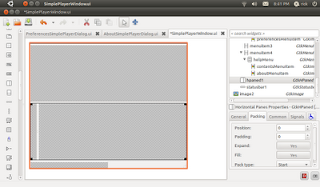
Make sure the HPaned starts out with an appropriate division of space. Do this by going to the General tab, and setting an appropriate number of pixels in Position property.
 The user should be able to scroll through the list, so click on ScrolledWindow in the toolbar, and then click in the left hand part of the HPaned to place it in there.
Now add a toolbar. Find the toolbar icon in the toolbox, click on it and click in the top space open space. This will cause that space to collapse, because the toolbar is empty by default.
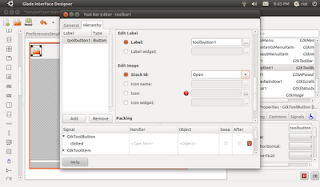
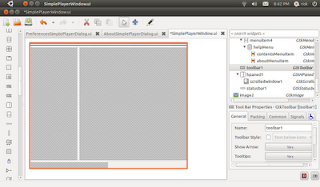 To add the open button click the edit button (looks like pencil) in Glade's toolbar. This will bring up the toolbar editing dialog. Switch to the Hierarchy tab, and click "Add". This will add a default toolbar button.
To turn this default button into an open button, first, rename the button to openbutton (this will make it easier to refer to in code). Then under Edit Image set Stock Id to "Open". That's all you need to do to make an open button in Glade.
Due to a bug in the current version of Glade, you might need to rename your tool bar button again. When you close the editor, look in the treeview. If the button is still called "toolbutton1", then select it, and use the general tab to change the Name property to "openbutton". Then save again.
Now if you use $quickly run again, you'll see that your toolbar button is there.
Coding the Media List.
Making the Open Button Work.
The open button will have an important job. It will respond to a click from the user, offer a directory chooser, and then build a list of media in that directory. So, it's time write some code.
You can use:
$quickly edit &
This will open your code Gedit, the default text and code editor for Ubuntu.
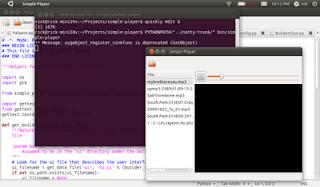
Switch to the file called "simple-player". This is the file for your main window, and the file that gets run when users run your app from Ubuntu.
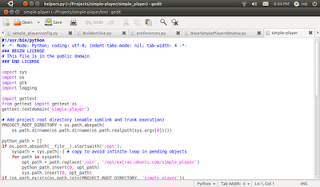 First let's make sure that the open button is hooked up to the code. Create a function to handle the signal that looks like this (and don't forget about proper space indenting in Python!):
<code>
 def openbutton_clicked_event(self, widget, data=None):
     print "OPEN"


</code>
Put this function under "finish_initializing", but above "on_preferences_changed". Save the code, run the app, and when you click the button, you should see "OPEN" printed out to the terminal.How did this work? Your Quickly project used the auto-signals feature to connect the button to the event. To use auto-sginals, simple follow this pattern when you create a signal handlder:
<code><br />def widgetname_eventname_event(self, widget, data=None):<br /><br /></code>Sometimes a signal handler will require a different signature, but (self, widget, data=None) is the most common.Getting the Directory from the User.
We'll use a convenience function built into Quickly Widgets to get the directory info from the user. First, go to the import section of the simple-player file, and around line 11 add an import statement:
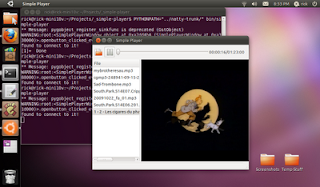
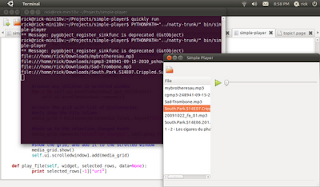
<code><br />from quickly import prompts<br /><br /></code>Then add to your openbutton_clicked_event function the code to prompt the user so it looks like this:<code><br />def openbutton_clicked_event(self, widget, data=None):<br />#let the user choose a path with the directory chooser<br />response, path = prompts.choose_directory()<br /><br />#make certain the user said ok before working<br />if response == gtk.RESPONSE_OK:<br /> #iterate through root directory<br /> for root, dirs, files in os.walk(path):<br /> #iterate through each file<br /> for f in files:<br /> #make a full path to the file<br /> print os.path.join(root,f)<br /><br /></code>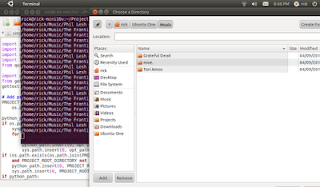 Now when you run the app you can select a directory, and it will print a full path to each file encountered. Nice start, but what the function needs to do is build a list of files that are media files and display those to the user.
Defining Media Files
This app will use a simple system of looking at file extensions to determine if files are media files. Start by specifying what file types are supporting. Add this in finish_initializing to create 2 lists of supported media:
<code><br />self.supported_video_formats = [".ogv",".avi"]<br />self.supported_audio_formats = [".ogg",".mp3"]<br /><br /></code>GStreamer supports a lot of media types so ,of course, you can add more supported types, but this is fine to start with.Now change the openbutton handler to only look for these file types:
<code><br />def openbutton_clicked_event(self, widget, data=None):<br />#let the user choose a path with the directory chooser<br />response, path = prompts.choose_directory()<br /><br />#make certain the user said ok before working<br />if response == gtk.RESPONSE_OK:<br /> #make one list of support formats<br /> formats = self.supported_video_formats + self.supported_audio_formats<br /> #iterate through root directory<br /> for root, dirs, files in os.walk(path):<br /> #iterate through each file<br /> for f in files:<br /> #check if the file is a supported formats<br /> for format in formats:<br /> if f.lower().endswith(format):<br /> #make a full path to the file<br /> print os.path.join(root,f)<br /><br /></code>This will now only print out files of supported formats.Build a List of Media Files
Simple Player will create a list of dictionaries. Each dictionary will have all the information that is needed to display and play the file. Simple Player will need to know the File name to display to the user, a URI to the file so that the file can be played, and the type of media. So, we'll create a list and add a dictionary to each support type to it.
<code><br />def openbutton_clicked_event(self, widget, data=None):<br />#let the user choose a path with the directory chooser<br />response, path = prompts.choose_directory()<br /><br />#make certain the user said ok before working<br />if response == gtk.RESPONSE_OK:<br /> #make one list of support formats<br /> formats = self.supported_video_formats + self.supported_audio_formats<br /><br /> #make a list of the supported media files<br /> media_files = []<br /> #iterate through root directory<br /> for root, dirs, files in os.walk(path):<br /> #iterate through each file<br /> for f in files:<br /> #check if the file is a supported formats<br /> for format in formats:<br /> if f.lower().endswith(format):<br /> #create a URI in a format gstreamer likes<br /> file_uri = "file://" + os.path.join(root,f)<br /><br /> #add a dictionary to the list of media files<br /> media_files.append({"File":f,"uri":file_uri, "format":format})<br /> print media_files<br /><br /></code>Display the List to the UserA DictionaryGrid is the easiest way to display the files, and to allow the user to click on them. So import DicationaryGrid at line 12, like this:
<code><br />from quickly.widgets.dictionary_grid import DictionaryGrid<br /></code>Starting in Natty, every window has a ui collection. You can use it to access all of the widgets that you have defined in Glade by their names. So, creating the list of media files, you can remove any old grids in the scrolled window like this:<code><br /> for c in self.ui.scrolledwindow1.get_children():<br /> self.ui.scrolledwindow1.remove(c)<br /></code>Then create a new DictionaryGrid. We only want one column, to the view the files, so we'll set up the grid like this:<code><br /> #create the grid with list of dictionaries<br /> #only show the File column<br /> media_grid = DictionaryGrid(media_files, keys=["File"])<br /><br /> #show the grid, and add it to the scrolled window<br /> media_grid.show()<br /> self.ui.scrolledwindow1.add(media_grid)<br /><br /></code>So now the whole function looks like this:<code><br />def openbutton_clicked_event(self, widget, data=None):<br />#let the user choose a path with the directory chooser<br />response, path = prompts.choose_directory()<br /><br />#make certain the user said ok before working<br />if response == gtk.RESPONSE_OK:<br /> #make one list of support formats<br /> formats = self.supported_video_formats + self.supported_audio_formats<br /><br /> #make a list of the supported media files<br /> media_files = []<br /> #iterate through root directory<br /> for root, dirs, files in os.walk(path):<br /> #iterate through each file<br /> for f in files:<br /> #check if the file is a supported formats<br /> for format in formats:<br /> if f.lower().endswith(format):<br /> #create a URI in a format gstreamer likes<br /> file_uri = "file://" + os.path.join(root,f)<br /><br /> #add a dictionary to the list of media files<br /> media_files.append({"File":f,"uri":file_uri, "format":format})<br /><br /> #remove any children in scrolled window<br /> for c in self.ui.scrolledwindow1.get_children():<br /> self.ui.scrolledwindow1.remove(c)<br /><br /> #create the grid with list of dictionaries<br /> #only show the File column<br /> media_grid = DictionaryGrid(media_files, keys=["File"])<br /><br /> #show the grid, and add it to the scrolled window<br /> media_grid.show()<br /> self.ui.scrolledwindow1.add(media_grid)<br /><br /></code>Now the list is displayed when the user picks the directory.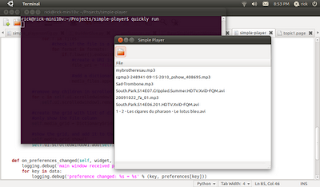
Playing the Media.
Adding the MediaPlayer
So now that we have the list of media for the users to interact with, we will use MediaPlayerBox to actually play the media. MediaPlayerBox is not yet integrated into Glade, so we'll have to write code to add it in. As usually, start with an import:
<code><br />from quickly.widgets.media_player_box import MediaPlayerBox<br /><br /></code>Then, we'll create and show a MediaPlayerBox in the finish_initializing function. By default, a MediaPlayerBox does not show it's own controls, so pass in True to set the "controls_visible" property to True. You can also do things like this:<code><br />player.controls_visible = False<br />player.controls_visible = True<br /><br /></code>to control the visibility of the controls.Since we'll be accessing it a lot, we'll create as a member variable in the SimplePlayerWindow class. Then to put it in the right hand part of the HPaned, we use the add2 function (add1() would put it in the left hand part).
<code><br />self.player = MediaPlayerBox(True)<br />self.player.show()<br />self.ui.hpaned1.add2(self.player)<br /><br /></code>We can't use $quickly run anymore though, because the MediaPlayerBox is only in the branch of Quickly Widgets that we downloaded called "natty-trunk". We can use PYTHONPATH to tell python to look in the natty branch for any libraries that it needs.But, there's one more thing that we need to to before this will run. We need to add "__init__.py" files to the directories so Python knows there are libraries there. You can do this simply with the touch command:
$touch ../natty-trunk/__init__py
$touch ../natty-trunk/quickly/__init__py
Now until MediaPlayerBox makes it into Natty, you can use this to run:
$PYTHONPATH="../natty-trunk/" bin/simple-player
This says to look for python libraries one directed up (that's the ".." part) and in the natty-trunk directory. In this way, your app can find the Python library you are using, even though it's still in development!
 Connecting to the DictionaryGrid Signals
Now we need to connect the dictionary_grid's "selection_changed" event, and play the selected media. So back in the openbutton_clicked_event function, after creating the grid, we can connect to this signal. We'll play a file when selection changes, so we'll connect to a play_file function (which we haven't created yet). This goes at the end of the function:
<code><br /> #hook up to the selection_changed event<br /> media_grid.connect("selection_changed", self.play_file)<br /></code>Now create that play_file function, it should look like this:<code><br /> def play_file(self, widget, selected_rows, data=None):<br /> print selected_rows[-1]["uri"]<br /><br /></code>Notice that the signature for the function is a little different than normal. When the DictionaryGrid fires this signal, it also passes the dictionaries for each row that is now selected. This greatly simplifies things, as typcially you just want to work with the data in the selected rows. If you need to know more about the DictionaryGrid, it passes itself in as the "widget" argument, so you can just work with that.All the function does now is get the last item in the list of selected rows (in Python, you can use -1 as an index to get the last item in a list. Then it prints the URI for that row that we stored in the dictionary back in openbutton_clicked_event.
 Setting the URI and calling play()
Now that we have the URI to play, it's a simple matter to play it. We simply set the uri property of our MediaPlayerBox, and then tell it to stop playing any file it may be playing, and then to play the selected file:
<code><br />def play_file(self, widget, selected_rows, data=None):<br /> self.player.stop()<br /> self.player.uri = selected_rows[-1]["uri"]<br /> self.player.play()<br /><br /></code>Now users can click on Videos and movies, and they will play. Since we decided to show the MediaPlayerBox's controls when we created it, we don't need to do any work to enable pausing or stopping. However, if you were creating your own controls, you could use player.pause() and player.stop() to use those functions.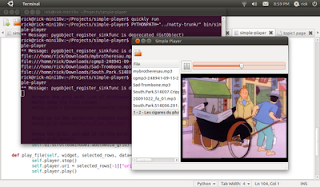
Connecting to the "end-of-file" Signal
When a media files ends, users will expect the next file played automatically. It's easy to find out when a media file ends using the MediaPlayerBox's "end-of-file" signal. Back in finish_initializing, after creating the MediaPlayerBox, connect to that signal:
<code><br />self.player.connect("end-of-file",self.play_next_file)<br /><br /></code>Changing the Selection of the DictionaryGridCreate the play_next_file function in order to respond when a file is done playing:
<code><br /> def play_next_file(self, widget, file_uri):<br /> print file_uri<br /><br /></code>The file_uri argument is the URI for the file that just finished, so that's not much use in this case. There is no particularly easy way to select the next row in a DictionaryGrid. But every widget in Quickly Widgets is a subclass of another PyGtk class. Therefore, you always have access to full power of PyGtk. A DictionaryGrid is a TreeView, so you can write code to select the next item in a TreeView:<code><br />def play_next_file(self, widget, file_uri):<br />#get a reference to the current grid<br />grid = self.ui.scrolledwindow1.get_children()[0]<br /><br />#get a gtk selection object from that grid<br />selection = grid.get_selection()<br /><br />#get the selected row, and just return if none are selected<br />model, rows = selection.get_selected_rows()<br />if len(rows) == 0:<br /> return<br /><br />#calculate the next row to be selected by finding<br />#the last selected row in the list of selected rows<br />#and incrementing by 1<br />next_to_select = rows[-1][0] + 1<br /><br />#if this is not the last row in the last<br />#unselect all rows, select the next row, and call the<br />#play_file handle, passing in the now selected row<br />if next_to_select < len(grid.rows):<br /> selection.unselect_all()<br /> selection.select_path(next_to_select)<br /> self.play_file(self,grid.selected_rows)<br /><br /></code>Making an Audio File ScreenNotice that when playing a song instead of a video, the media player is blank, or a black box, depending on whether a video has been player before.
 It would be nicer to show the user some kind of visualization when a song is playing. The easiest thing to do would be to create a gtk.Image object, and swap it when for the MediaPlayerBox when an audio file is playing. However, there are more powerful tools at our disposal that we can use to create a bit richer of a user experience.
This section will use a GooCanvas to show you how to compose images and text together. A GooCanvas is a very flexible surface on which you can compose and animate all kinds of 2D experiences for users. This tutorial will just scratch the surface, by combining 2 images and some text together. We'll show the Ubuntu logo image that is already built into your project, but a musical note on top of that for some style, and then put the current song playing as some text.
Create a Goo Canvas
Naturally, you need to import the goocanvas module:
<code><br />import goocanvas<br /><br /></code>Then, in the finish_initializing function, create and show a goocanvas.Canvas:<code><br />self.goocanvas = goocanvas.Canvas()<br />self.goocanvas.show()<br /><br /></code>The goocanvas will only be added to the window when there is an audio playing file, so don't pack it into the window yet. But let's an image to the goocanvas so we can make sure that we have the system working.Add Pictures to the GooCanvas
Add an image to the goocanvas by creating a goocanvas.Image object. First, we'll need to create a gtk.Pixbuf object. You can think of a gtk.Pixbuf as an image stored in memory, but it has a lot of functions to make them easier to work with than just having raw image data. We want to use the file called "background.png". In a quickly project, media files like images and sounds should always go into the data/media directory so that when users install your programs, the files will go to the correct place. There is a helper function called get_media_file built inot quickly projects to get a URI for any media file in the media directory. You should always use this function to get a path to media files, as this function will work even when your program is installed and the files are put into different places on the user's computer. get_media_file returns a URI, but a pixbuf expects a normal path. It's easy to fix this stripping out the beginning of the URI. Since it was created for you, can could also change the way get_media_player works, or create a new function, but this works too:
<code><br />logo_file = helpers.get_media_file("background.png")<br />logo_file = logo_file.replace("file:///","")<br />logo_pb = gtk.gdk.pixbuf_new_from_file(logo_file)<br /><br /><br /></code>You don't actually pass the goocanvas.Image into the goocanvas.Canvas, rather you tell the goocanvas.Image that it's parent is the rootA_items of the goocanvas. You can also set other properties when you create it, such as the x and y coordinates, and of course the pixbuf to use:<code><br />root_item=self.goocanvas.get_root_item()<br />goocanvas.Image(parent=root_item, pixbuf=logo_pb,x=20,y=20)<br /><br /><br /></code>Show the GooCanvas When a Song is PlayingSo now we want to take the MediaPlayerBox out of the HPaned when a song is playing and show the goocanvas, and also visa versa. We can easily extract the format of the file because we included it in the dictionary for the row when we created the DictionaryGrid in the openbutton_clicked_event function:
<code><br />format = selected_rows[0]["format"]<br /><br /></code>We can also get a reference to the visual that is currently in use:<code><br />current_visual = self.ui.hpaned1.get_child2()<br /><br /></code>Knowing those two things, we can then figure out whether to put in the goocanvas.Canvas or the MediaPlayerBox. So the whole function will look like this:<code><br />def play_file(self, widget, selected_rows, data=None):<br />self.player.stop()<br />format = selected_rows[0]["format"]<br />current_visual = self.ui.hpaned1.get_child2()<br /><br />#check if the format of the current file is audio<br />if format in self.supported_audio_formats:<br /> #if it is audio, see if the current visual is<br /> #the goocanvas, if it's not, do a swapperoo<br /> if current_visual is not self.goocanvas:<br /> self.ui.hpaned1.remove(current_visual)<br /> self.ui.hpaned1.add2(self.goocanvas)<br />else:<br /> #do the same thing for the player<br /> if current_visual is not self.player:<br /> self.ui.hpaned1.remove(current_visual)<br /> self.ui.hpaned1.add2(self.player)<br /><br />#go ahead and play the file<br />self.player.uri = selected_rows[-1]["uri"]<br />self.player.play()<br /><br /></code>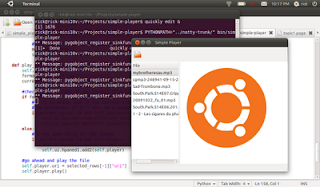
Add another Image to Canvas
We can add the note image to the goocanvas.Canvas in the same way we added the background image. However, this time we'll play with the scale a bit:
<code><br />note_file = helpers.get_media_file("note.png")<br />note_file = note_file.replace("file:///","")<br />note_pb = gtk.gdk.pixbuf_new_from_file(note_file)<br />note = goocanvas.Image(parent=root_item, pixbuf=note_pb,x=175,y=255)<br />note.scale(.75,.6)<br /><br /></code>Remember for this to work, you have to put a note.png file in the data/media directory for your project. If your image is a different size, you'll need to tweak the x, y, and scale as well.(BTW, thanks to Daniel Fore for making the artwork used here. If you haven't had the pleasure of working Dan, he is a really great guy, as well as a talented artist and designer. He's also the leader of the #elementary project.)
A goocanvas.Image is a goocanvas.Item. There are different kinds of Items and many of interesting visual things you can do with them. There are items like shapes and paths. You can change things like their scale, rotation, and opacity. You can even animate them!
 Add Text to the goocanvas.Canvas
One kind of goocanvas.Item is goocanvas.Text. You create it like a goocanvas.Image. We won't use any text when we create it, because that will be set later when we are playing a song. Since the goocanvas.Text will be accessed from the play_file function, it should be a member variable for the window. So after adding the note image in the finish_initializing function, you can go ahead and add the text.
<code><br />self.song_text = goocanvas.Text(parent=root_item,text="", x=5, y=5)<br />self.song_text.set_property("font","Ubuntu")<br />self.song_text.scale(2,2)<br /><br /></code>Update the TextThe text property of the goocanvas.Text object should then be set when an audio file is played. Add a line of code to do this in the play_file function, after you've determined the file is an audio file:
<code><br /> self.song_text.set_property("text",selected_rows[0]["File"])<br /><br /></code>Now when an audio file is playing the title shows.Moving the Media Player Controls.
You've probably noticed a pretty bad bug, when an audio file is playing the user can't access the controls for the media player. Even if that were not the case, are 2 toolbars, one for the controls, and one that only has the openbutton. Also, the controls are shifted over because of the DictionaryGrid, so the time labels are not visible by default.
Fortunately, PyGtk let's you move widgets around really easily. So, it's possible to write a little code that:
- Creates the openbutton in code instead of glade
- Takes the toolbar for the MediaPlayer controls out of the MediaPlayer
- Inserts the openbutton into the controls exactly where we want it
- Adds the controls back into the window
 Then, back in finish_initializing, after creating the MediaPlayerBox, remove the controls:
<code><br />self.player = MediaPlayerBox(True)<br />self.player.remove(self.player.controls)<br /><br /></code>Then, create a new openbutton:<code><br />open_button = gtk.ToolButton()<br /><br /></code>We still want the open button to be a stock button. For gtk.ToolButtons, use the set_stock_id function to set the right stock item.<code><br />open_button.set_stock_id(gtk.STOCK_OPEN)<br /><br /></code>Then show the button, and connect it to the existing signal handler.<code><br />open_button.show()<br />open_button.connect("clicked",self.openbutton_clicked_event)<br /><br /></code>The MediaPlayerBox's controls are a gtk.Toolbar object. So, insert the open_button into the controls using the gtk.Toobar classes insert command. Pass in a zero to tell the gtk.Toolbar to put open_button first. Then you can show the controls, and pack them into the window:<code><br />self.player.controls.insert(open_button, 0)<br />self.ui.hbox1.pack_start(self.player.controls, True)<br /><br /></code>Now users can use the controls even when audio is playing!
source: Raving Rick

If you liked this article, subscribe to the feed by clicking the image below to keep informed about new contents of the blog:

0 comments:
Post a Comment