


Accessibility, also referenced as "Assistive Technology" or "Universal Access," is a key priority for Ubuntu MATE. When computer access is shared within a household or business and where individual needs differ, Ubuntu MATE is an excellent solution.
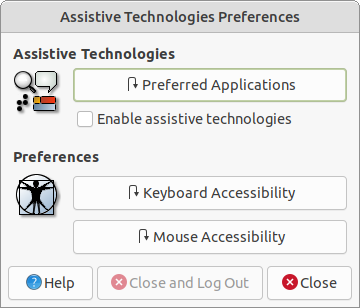
Preference settings for basic accessibility setting are found in the Control Center at Menu > Control Center > Assistive Technology . From there you can check the box to enable assistive applications, change which visual and mobility applications are used by default, and even change whether they are started when your computer starts up. You can also modify your keyboard (sticky keys, slow keys, bounce keys) and mouse (locate pointer, acceleration, sensitivity, drag & drop, double-click timeout) accessibility settings from here. You can even enable an on-screen keyboard if you need it.
Ubuntu MATE has many keyboard shortcuts that, by pressing a combination of keys, help you do things that normally require a mouse, trackpad, or another input device that might also require sight or muscular range of motion not possible for some computer users requiring accessibility. For some of these keyboard shortcuts, Ubuntu MATE makes use of a special meta key, the "Super" key, available on most computer keyboards. The Super key can be used to activate the menus/launchers and many keyboard shortcuts that include the Super key. Note that on computer keyboards designed for use with the Windows operating system, the Super key is labeled with the "Windows" logo. On keyboards designed for use with Apple's operating system, the Super key is labeled as the "Command" key. On computers designed for Linux, the Super key may be labeled with the Tux penguin logo (the Linux mascot), the Ubuntu logo, or perhaps even a blank square. For additional information about keyboard shortcuts and enabling the Super key on some computer hardware, see the section: • • • KEYBOARD SHORTCUTS • • • .
Enabling Accessibility at Startup
When Ubuntu MATE is first installed as your computer's operating system, it is pre-configured so that both Orca , the screen reader, and Onboard , the on-screen keyboard, are already installed and running in the background. All you need to do to use them is press the keyboard shortcut detailed in each section below to turn the feature on. You use the same shortcut to turn each application off again.
If you want to use these features at the login screen, before Ubuntu MATE even starts, the accessibility icon in the upper right of the screen lets you toggle on and off Orca and Onboard . You can also use Orca 's keyboard shortcut Alt + Super + S to enable the screen reader to assist in the login process.
Orca Screen Reader
 The Orca screen reader is a free, open source, flexible, and extensible screen reader that provides you with access to the graphical desktop via user-customizable combinations of speech and/or braille. It is pre-installed in Ubuntu MATE for blind and low vision users. At the login screen, and after Ubuntu MATE starts, you toggle the screen reader off and on by pressing Alt + Super + S .
With some other Linux distributions, getting Orca to work can be tricky. With Ubuntu MATE all the setup is done for you. It also works nicely with pretty much all of the pre-installed software, including the LibreOffice office suite and the Firefox browser.
For complete information about using and configuring the Orca screen reader, refer to the website https://help.gnome.org/users/orca/stable/ .
The Orca documentation on the website occasionally refers to the "Orca Modifier" key. The key that Orca uses by default as the "Orca Modifier" depends on whether you are using Orca 's "Laptop" keyboard layout or its "Desktop" keyboard layout.
Orca Modifier
If you are using Orca 's "Laptop" layout, the default Orca Modifier will be CapsLock .
If you are using Orca 's "Desktop" layout, for the Orca Modifier you can use either the normal Insert key or the KeyPad+ Insert . On US keyboards, KeyPad+ Insert is the same key as the 0 (zero) on the numeric keypad.
You can use the "Orca Modifier" key to get to Orca 's help. Press Orca Modifier + H to enter "learn mode".
Orca Help
To view Orca 's documentation, press F1 .
To hear a list of Orca 's shortcuts, press F2 .
To hear a list of Orca 's shortcuts for the current application, press F3 .
To learn more about how to use Orca to read documents and websites, see the web page: https://help.gnome.org/users/orca/stable/#reading.
You may find that the screen reader speaks too slowly or too quickly for you. You can adjust the rate at which Orca speaks, and make other adjustments as well, in Orca Preferences. To get to the Orca Preferences screens, press Orca Modifier + Spacebar . If you find yourself needing to adjust the speed frequently, you might want to bind (map) the "increase the rate" and "decrease the rate" commands to specific keys. That way you can more easily make these adjustments. To review (and setup) the keyboard shortcuts and commands that Orca uses, you will want to refer to the documentation on key bindings on this web page: https://help.gnome.org/users/orca/stable/howto_key_bindings.html.en .
This is just a small sampling of the documentation that is available to you on the Orca site. Browse around. Discover what this powerful tool can do!
Onboard On-Screen Keyboard
 Onboard is the name of Ubuntu MATE's on-screen keyboard. Onboard is pre-installed in Ubuntu MATE and is available at the press of a few keys for anyone requiring the use of an on-screen keyboard in place of a traditional hardware keyboard. In addition to supporting mobility-impaired users, Onboard provides support for tablet and touch-screen computers. To turn Onboard off or on again from the hardware keyboard, press Alt + Super + K .
You can also enable Onboard so that it is available on-screen right at startup:
- Open the Assistive Technologies Preference tool, found at Menu Control Center Assistive Technology .
- Check the box labeled Enable assistive technologies .
- Click the Preferred Applications button.
- Select the Accessibility tab.
- Under Mobility select Onboard .
- Check the box labeled Run at start and click Close .
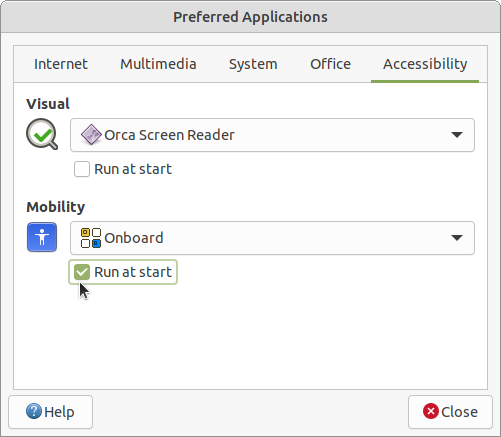
Additional settings and preferences for Onboard are listed in the Control Panel in the Personal section as Onboard Settings .
Screen Magnifier
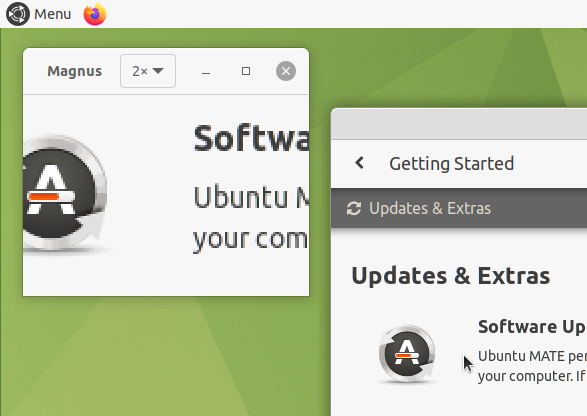
 If you are a low vision computer user and you require screen magnification, Magnus is a very simple desktop magnifier, showing the area around the mouse pointer in a separate window. You can select the level of magnification that works for you between two, three, four, and five times. The screen magnifier is also useful for accurate graphical design or detail work. To turn on or off the screen magnifier, press Alt + Super + M .
Mobility Features
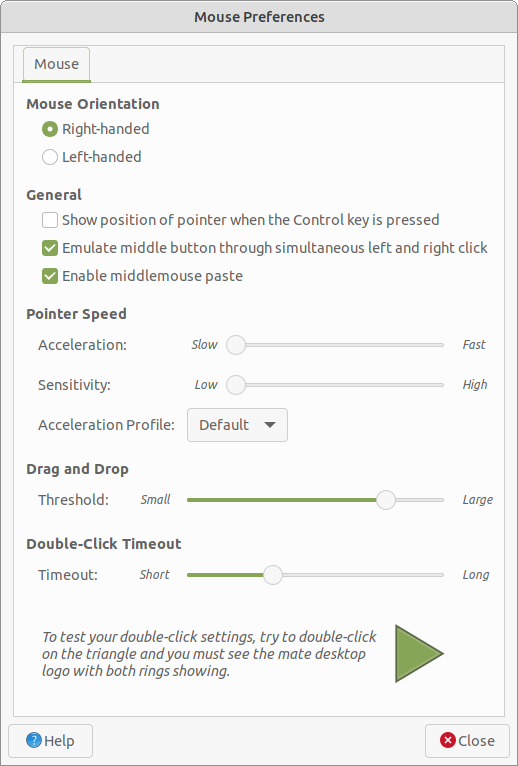
 The Control Panel provides preferences for Mouse and Keyboard that each offer settings that will be of interest to users with mobility impairments.
Mouse Preferences provide the ability to adjust the Pointer Speed sliders until the pointer motion is comfortable for you. A tab is provided for mouse and touchpad with sliders for each device. You can set different pointer speed for each type of device. For example, you can have one scroll speed for a laptop touchpad and another for a mouse. Sometimes the most comfortable settings for one type of device are not the best for another.
Note
The Touchpad section only appears if your system has a touchpad, while the Mouse section is only visible when a mouse is plugged in.
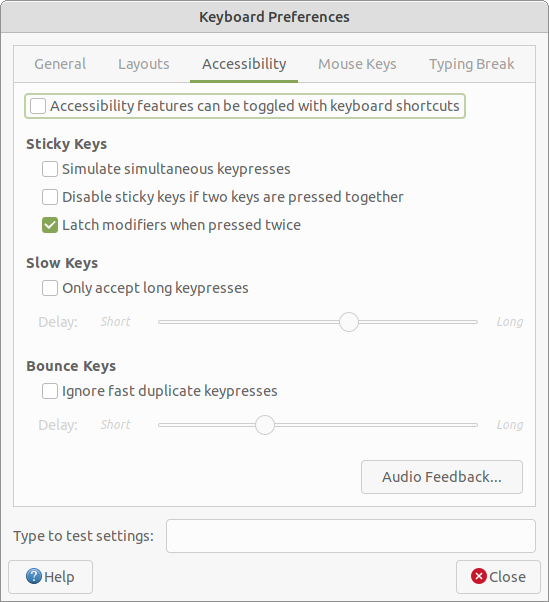
The Keyboard Preferences provides several tabs that have settings allowing you to adjust the following:
- Keyboard navigation — Use applications and the desktop without a mouse.
- Turn on bounce keys — Ignore quickly-repeated key presses of the same key.
- Turn on slow keys — Have a delay between a key being pressed and that letter appearing on the screen.
- Turn on sticky keys — Type keyboard shortcuts one key at a time rather than having to hold down all of the keys at once.
0 comments:
Post a Comment